[7-1] バックグランドのファイルを見つける:
これまではggf生成過程でできるH→ZZ→4μの解析をしてきた。この信号に対して、主要な
バックグランドとしてZZが直接出来る過程がある。それらのntuple ファイルは
atl.cc.kek.jpでは
/dfs/g/atl/atls_ph/runatlf/ntpl/v2a/pythia6_tauola/bg/
atlas.icepp.s.u-tokyo.ac.jpでは
/home/atljphys/runatlf/ntpl/v2a/pythia6_tauola/bg/
に
zz_cteq5l_llumi_n0001.ntpl から zz_cteq5l_llumi_n0100.ntpl まである。
[7-2] chainによる複数のntupleファイルの参照:
Current directoryにはシンボリックリンク bg_sample/ が張ってあるとして[1-2]、
> paw
PAW> nt/chain bg bg_sample/zz_cteq5l_llumi_n0001.ntpl | bgという新chainにzz_llumi_n001.ntplを追加。
PAW> nt/chain bg bg_sample/zz_cteq5l_llumi_n0002.ntpl | bgにzz_llumi_n002.ntplを追加。
PAW> nt/chain bg bg_sample/zz_cteq5l_llumi_n0003.ntpl
PAW> nt/chain bg bg_sample/zz_cteq5l_llumi_n0004.ntpl
PAW> nt/chain bg> | chain bgの内容を見る。
PAW> cd //bg | current directoryを//bgに移す。
PAW> ldir //
PAW> exec hist200.kumac | histogram creation
PAW> zone 2 2
PAW> n/loop 102 xmass.f(7.0) | ntuple data scanning using n/loop
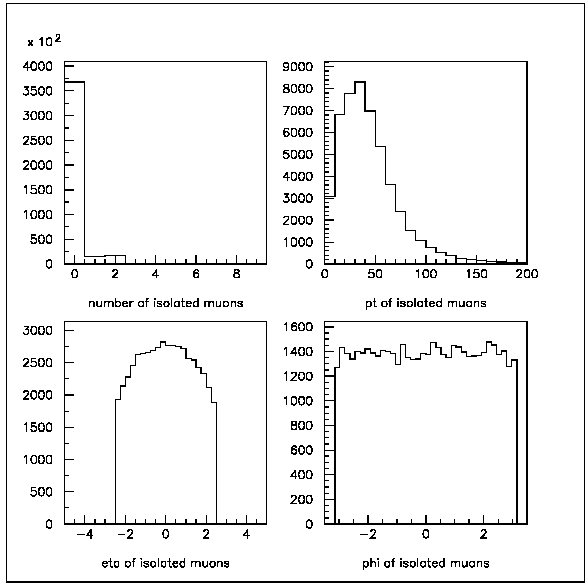
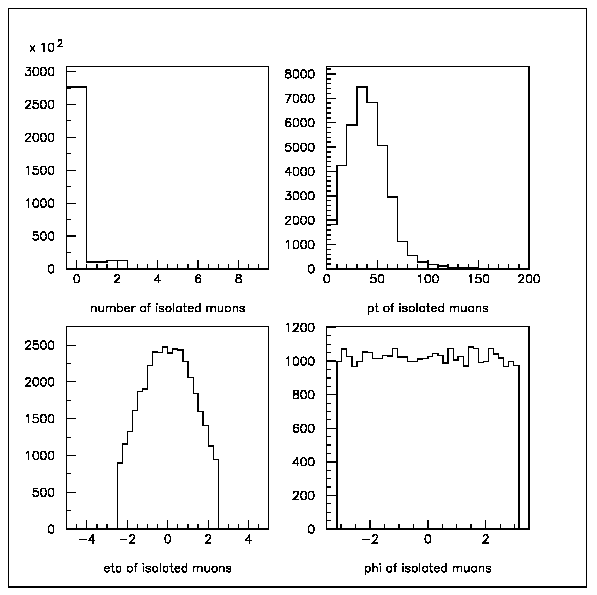
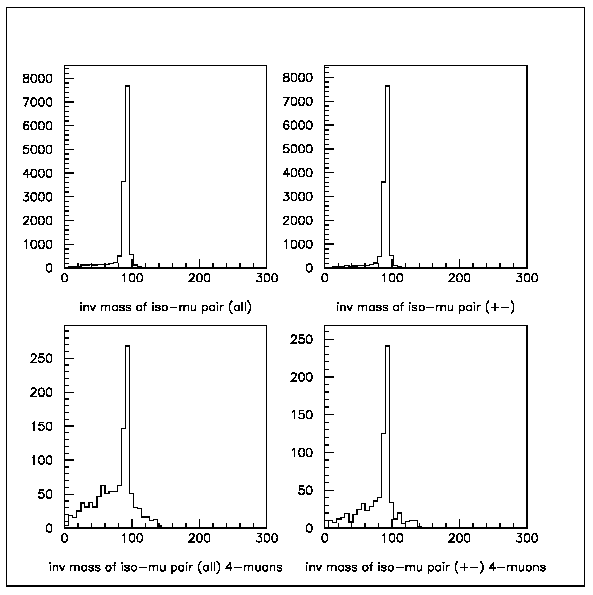
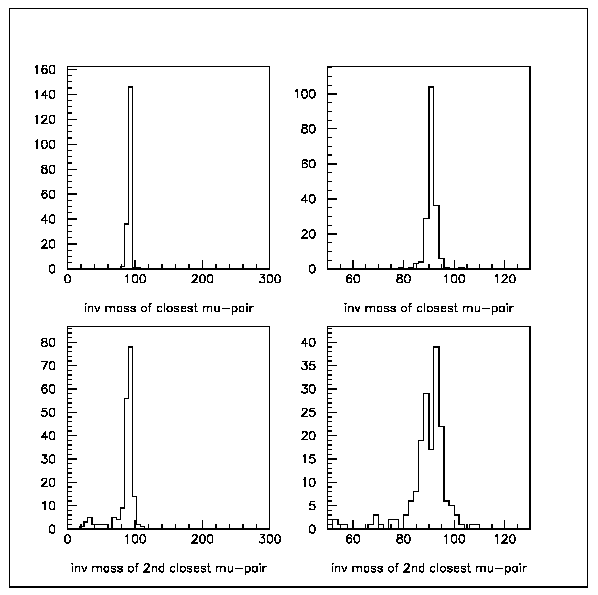
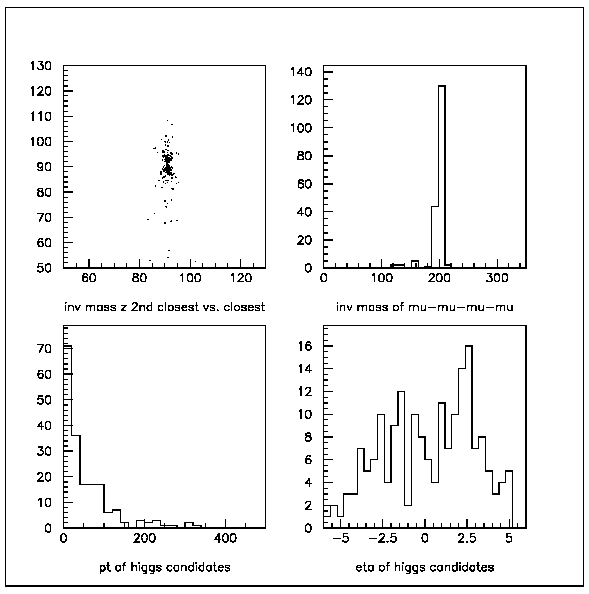
PAW> h/pl 11,12,13,14 | plot histograms --> out7a.gif
PAW> h/pl 21,22,23,24 | plot histograms
PAW> h/pl 25,26,27,28 | plot histograms
PAW> h/pl 29,31,32,33 | plot histograms
[7-3] マクロ内でdo loopを使用してchainを作る:
ファイル数が多い時はタイプ入力が面倒なので、zzbg_chain.kumacというマクロを作る。
PAW> exec hist200.kumac | histogram creation
PAW> zone 2 2
PAW> exec zzbg_chain.kumac | マクロの実行
PAW> chain bg> | chain bgの内容を確認する。
PAW> cd //bg
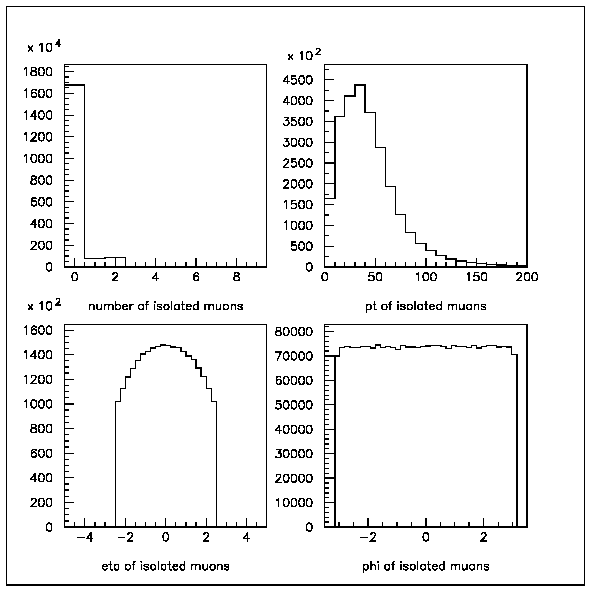
PAW> n/loop 102 xmass.f(7.0) | 100ファイルをなめるので時間がかかる。
PAW> h/pl 11,12,13,14 | plot histograms --> out7b.gif
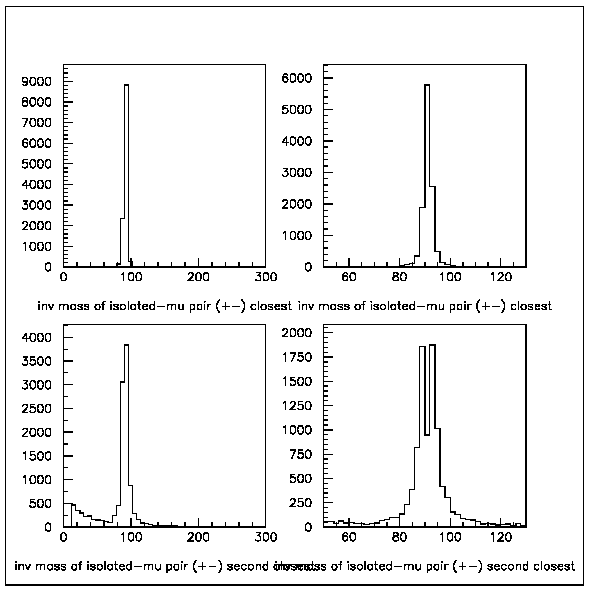
PAW> h/pl 21,22,23,24 | plot histograms --> out7c.gif
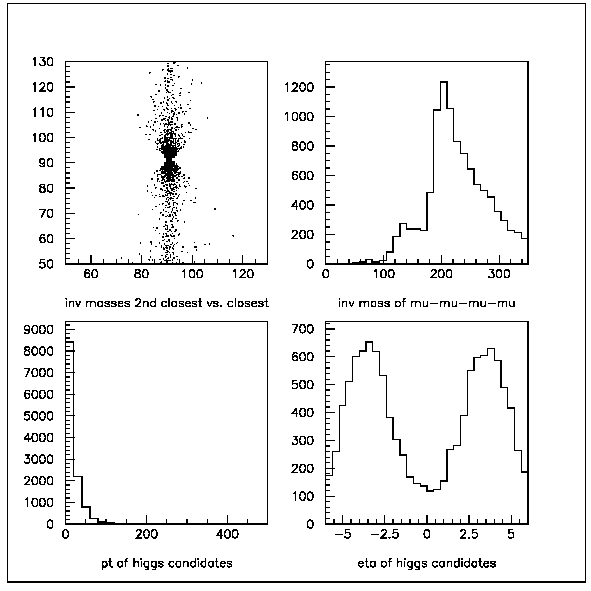
PAW> h/pl 25,26,27,28 | plot histograms --> out7d.gif
PAW> h/pl 29,31,32,33 | plot histograms --> out7e.gif
PAW> h/file 0 pawh-bg.hbook 1024 n | 新しくpawh-bg.hbookを作る。
PAW> hrout 0 | 0=全てのhistogram内容をpawh-bg.hbookに書き込む。
同様にhiggsデータの方もggf200_chain.kumacを作って処理する。
PAW> exec hist200.kumac | histogram creation
PAW> zone 2 2
PAW> exec ggf200_chain.kumac | マクロを実行してggf200をつくる。
PAW> chain | chainをリストする。
PAW> chain ggf200> | chain higgsの内容をプリントして確認する。
PAW> h/op/reset 0 | 全てのヒストグラムをリセット。
PAW> cd //ggf200 | loop over ggf200
PAW> n/loop 102 xmass.f(7.0) | 少し時間がかかる。
PAW> h/pl 11,12,13,14 | plot histograms --> out7f.gif
PAW> h/pl 21,22,23,24 | plot histograms --> out7g.gif
PAW> h/pl 25,26,27,28 | plot histograms --> out7h.gif
PAW> h/pl 29,31,32,33 | plot histograms --> out7i.gif
PAW> h/file 0 pawh-ggf200.hbook 1024 n | 新しくpawh-bg.hbookを作る。
PAW> hrout 0 | 全てのHistogramの書きこみ。
PAW> chain -ggf200 | chain ggf200を消去する。
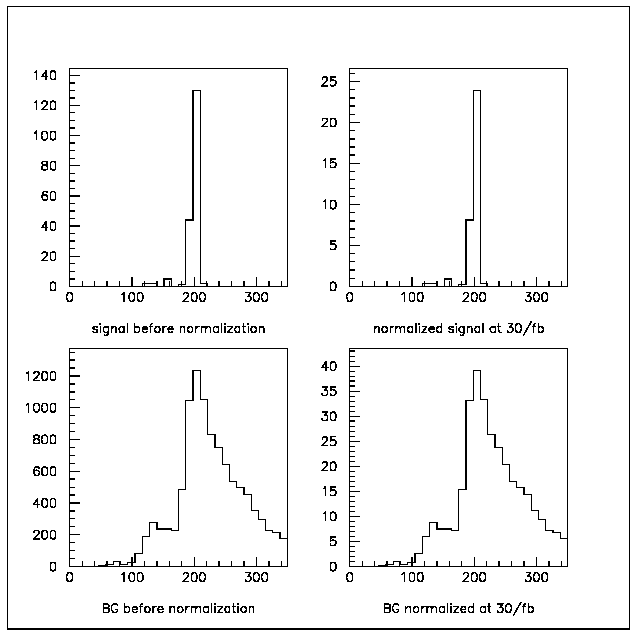
[7-4] ヒストグラムのNormalizationを行う。
(1) [6-2]に示したように、zz_cteq5l_llumi_n0001.ntplのlog fileである
zz_cteq5l_llumi_n0001.log.gzの最後の部分を見る→zz_log.txtのはず。
(2) [6-3]と同じ方法で、zz_cteq5l_llumiの100ファイル分(10,000,000 events)のweight factorを計算すると、
WFACTOR = 0.0317 になるはず。
(3) BG表の数字と一致していることを確認する。
PAW> close 0 | 全てのdirectoryを消す。
PAW> h/del 0
PAW> h/file 0 pawh-ggf200.hbook 0 | signal解析の出力pawh.hbookの開く。
PAW> hrin 31
PAW> h/copy 31 131 'signal before normalization' | ヒストグラム 131 を生成する。
PAW> h/copy 31 1131 'normalized signal at 30/fb' | ヒストグラム 1311 を生成する。
PAW> h/op/add 1131 1131 1131 0.184 0. | signalのnormalization, w=0.552/3=0.184をかける←[6-3]
PAW> h/file 0 pawh-bg.hbook 0 | background解析の出力pawh-bg.hbookの開く。
PAW> hrin 31
PAW> h/copy 31 231 'BG before normalization'
PAW> h/copy 31 1231 'BG normalized at 30/fb'
PAW> h/op/add 1231 1231 1231 0.0317 0. | backgroundのnormalizationにw=0.0317をかける。
PAW> zone 2 2
PAW> h/pl 131,1131
PAW> h/pl 231,1231 | signalとbackgroundを比較する→out7j.gif
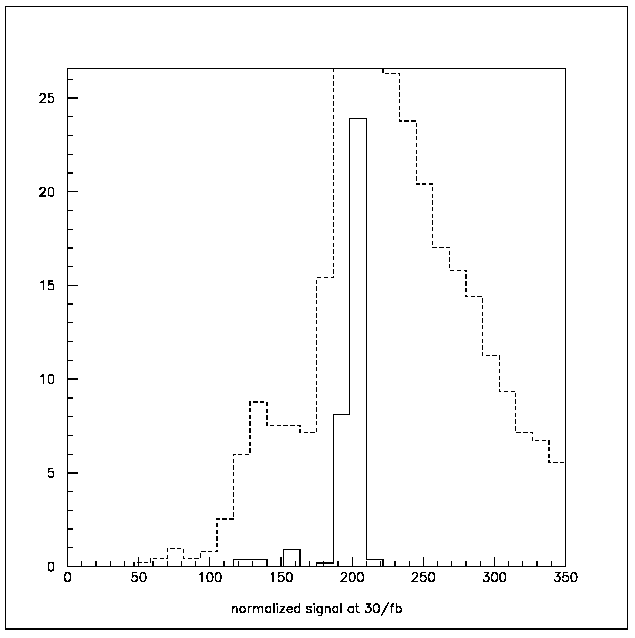
PAW> zone 1 1
PAW> h/pl 1131
PAW> h/pl 1231 s | signalとbackgroundを同じプロットに重ねる→out7k.gif
PAW> exit
→→→→→ 入門コース#8ヘ行く。