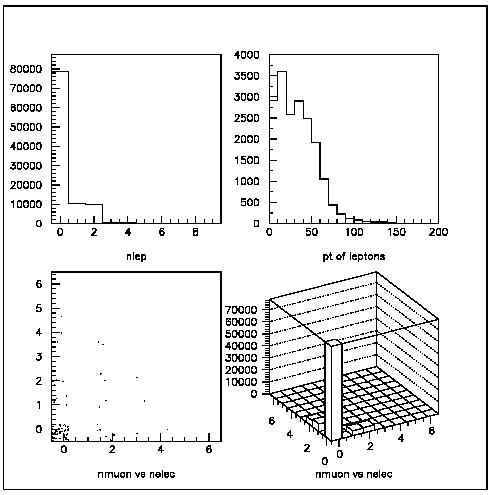
[3-1] ヒストグラムを生成する: > paw PAW起動 PAW> hist/create/1d 11 'nlep' 10 -0.5 9.5 | ID=11の1次元histrogram生成 PAW> 1d 12 'pt of leptons' 20 0. 200. | ID=12の1次元histrogram生成 [注1] PAW> 2d 22 'nmuon vs nelec' 10 -0.5 6.5 10 -0.5 6.5 | 2次元histogram PAW> cd //pawc | directoryをpawcに移す。[注3] PAW> h/list | histogramができているかの確認→→→→→ 入門コース#4ヘ行く。[3-2] ntuple データを解析して、ヒストグラムに入れる: PAW> h/file 1 higgs_sample/hpro-ggf_hd-zz_hm0200_cteq5l_llumi_n0001.ntpl 0 PAW> n/proj 11 //lun1/102.nmu+nel | '//lun1/'はdirectoryを示す PAW> n/proj 12 //lun1/102.pmu(3,1:nmu) PAW> h/pl 11,12 | histogram 11 12 の表示 PAW> n/proj 22 //lun1/102.nmu%nel PAW> h/pl 22 | 2次元plot PAW> h/pl 22 lego | lego plot ここまでのプロットはout3a.gifのようになるはず。 PAW> h/op/reset 0 | 全てのhistogramをreset
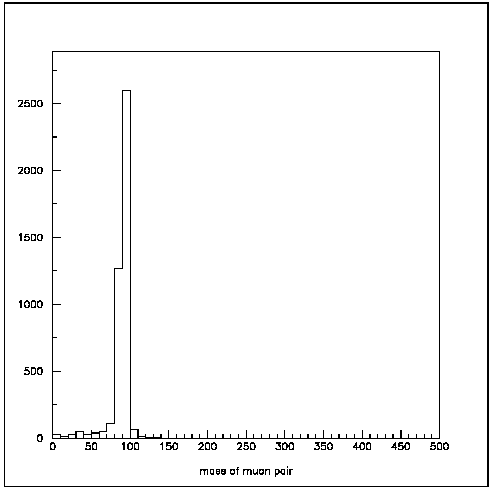
[3-3] 関数 invmass.f で計算した不変質量をヒストグラムで表示する: PAW> 1d 23 'mass of muon pair' 50 0. 500. PAW> n/proj 23 //lun1/102.invmass.f(7.) nisomu>1 PAW> zone 1 1 PAW> h/pl 23 | out3b.gifのようになるはず。
[3-4] KUMACファイの使用: ヒストグラムの定義をいちいち入力するのは面倒なので、ヒストグラム生成のKUMACファイル hist200.kumac を作る。 PAW> sh | PAWを終らせないで一時的にshellに戻る。 ---------(ここで hist200.kumac ファイルを作成する)-------------------- > exit | これでshellからPAWに戻る。 PAW> h/del * | 今までに histogram を全て消去する。 PAW> h/list //pawc | 消去の確認 PAW> exec hist200.kumac | kumacの実行。[注2] PAW> cd //pawc | pawcのdirectoryに一時的に移る。[注3] PAW> h/list | histogramの存在の確認。 (out3a.txt) PAW> cd //lun1 | directory LUN1へ移る。 PAW> zone 2 2 PAW> n/proj 11 102.nisomu | data scanする。[注4] PAW> n/proj 12 102.pmu(3,1:nisomu) PAW> n/proj 21 102.invmass.f(7.) nisomu>1 PAW> n/proj 23 102.invmass.f(20.) nisomu>1.and.chgmu(1)*chgmu(2)=-1 PAW> h/pl 11,12,21,23 | out3c.gifが表示されるはず。
[3-5] PAWの出力を postscript file にしてプリント出力する: PAW> fort/file 66 out.ps | out.ps をopenする。 PAW> grap/meta 66 -111 | graphic/metafileの略, -111:縦書 -112:横書 PAW> h/pl 11,12,21,23 | PAWでプロットする。 PAW> close 66 | LUN66を閉じる。 PAW> sh ls | out.psというファイルが出来ていることを確認する。 PAW> sh gv out.ps | ghostviewerでpreviewを見る。[注5] PAW> sh lpr -P "printer-name" out.ps | プリンターに出力する。out3c.gifが出るはず。
[3-6] 入力データもKUMACで行う: open/attachするfileも datafile.kumacにしておく。 PAW> close 1 | LUN1をcloseする。 PAW> ldir // | PAW> exec datafile.kumac | LUN1をopenする。 PAW> ldir // | LUN1が所定のファイルにリンクされていることを確認する。 PAW> exit